What happens if you don’t have physical access to a sensitive device you need to debug? Without specialized tools, this can be tricky — especially if the device is on another network. But there is a way, and we built one using Android's ADB tool with a few select modifications.
Android Device Management
Step one: A tool for remote debugging Android
Esper’s Secure Remote ADB is the same tool as Google's Android ADB (to learn about ADB, read our guide here), but instead of requiring a physical or local network connection, it can be used from anywhere in the world through an encrypted tunnel for remote device connect. It’s an essential tool for fleet management.
So, let’s say it’s Thanksgiving Day, and you get a call that your PoS (point of sale) app at the flagship store keeps crashing right before they are about to open up to the Black Friday mob. You are in the middle of your company's biggest flash sale ever, and your kiosk keeps crashing, because of course it does.
We’ve all been there, where that one device or store doesn’t operate correctly out of your fleet of thousands, and no one can figure out why. Whether you see the random one-off in Crashlytics or the regional VP is calling you at 6 am, what can you do short of hopping on a plane with your laptop and USB cable?
Esper offers a means to use Android ADB remote control (securely, via an SSL tunnel). Let’s take a closer look at exactly how to use Secure Remote ADB on the Esper platform, shall we?
Set up ADB to Remotely Debug Deployed Devices
With Esper, you can initiate a secure remote ADB session with any Esper-provisioned Android device. If you are running Esper Foundation for Android, you even get zero-touch secure remote ADB.
In addition to setting up an endpoint and provisioning your device in the Esper Console, you’ll need to install the Esper CLI and configure it to your Esper endpoint. Once that’s done, jump back into the console to get started.
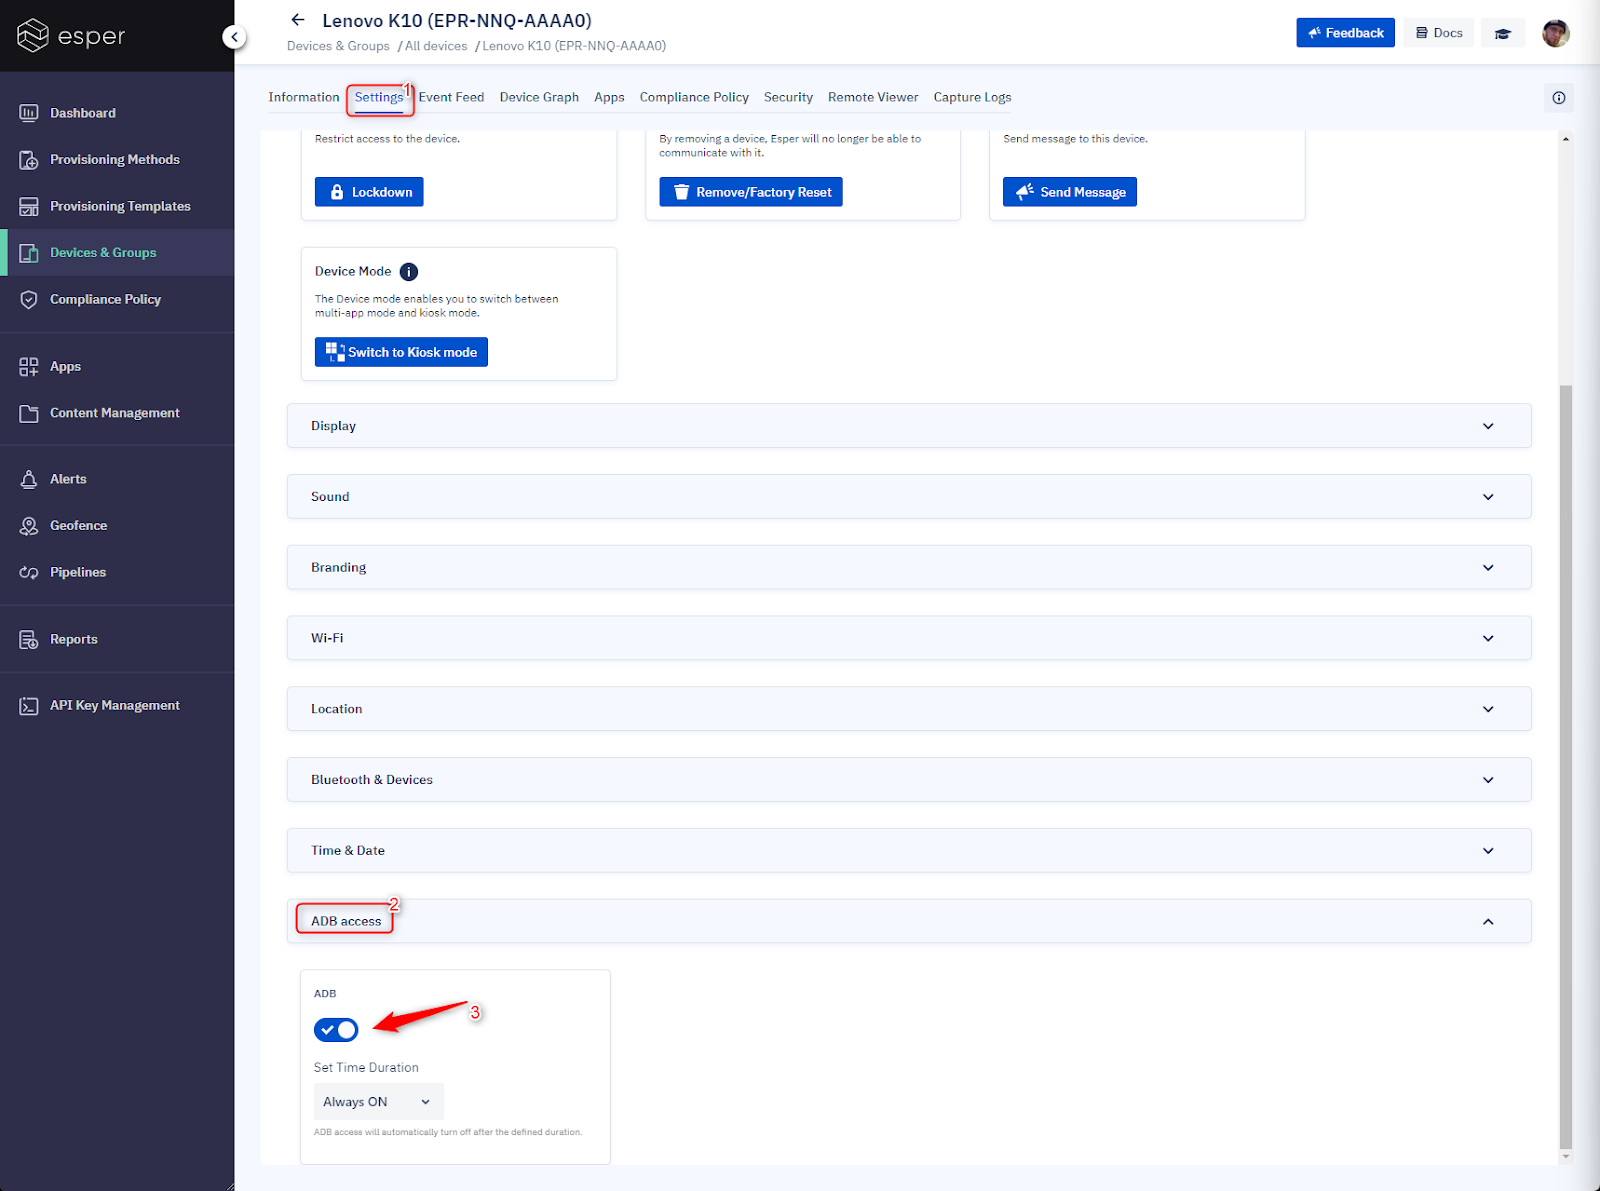
Go to Devices & Groups, select the device you want to initiate an ADB session, then click on the Settings tab. Scroll down to the bottom until you see the ADB access menu, then enable ADB. If the ADB switch is disabled, you’ll need to push a Compliance Policy update with ADB enabled to toggle it.

To ensure security, Android ADB remote control sessions are limited to 30 minutes. Of course, you can establish a new session if more than 30 minutes is needed.
For stock Android devices (read: any device not running Esper Foundation for Android), another step needs to be executed locally on the device. The device port has to be open for the Esper Agent running on the device to set up the secure connection using the Esper Platform. The ADB port is 5555.
You can have someone locally perform this action on behalf of the development team. Once the device is connected via USB to a PC running some form of terminal with ADB (approving the permissions asked for on the device), run this command to enable ADB over tcpip:
adb tcpip 5555
Here's the return status you will see:
restarting in TCP mode port: 5555
Again, the above command is unnecessary for Esper Foundation for Android devices. It’s also worth noting that this will need to be re-done after every reboot.
Now, we’ll switch over to espercli (as we said earlier, you’ll need to set up the Esper CLI using instructions on this page). Once espercli is set up, you’ll use the following command with the device ID you want to connect to. In our example, the device ID is ESP-DMO-AZ40:
espercli secureadb connect -d ESP-DMO-AZ40
You should get this message:
Initiating Remote ADB Session. This may take a few seconds…
Note: If you’re using Windows and having issues getting espercli to work in PowerShell, we recommend using the Windows Subsystem for Linux.
Wait for it…and there you go! Note the endpoint address shown below will likely be different for your session:
Secure ADB Client
Please connect ADB client to the following endpoint: 127.0.0.1:51556
If adb-tools is installed, please run the command below:
adb connect 127.0.0.1:51556
Press Ctrl+C to quit!
Open a new terminal window and start up your ADB connection using the IP address supplied by the secureadb command from the espercli:
adb connect 127.0.0.1:51556
You'll get this message back:
Connected to 127.0.0.1:51556
You now have a secure remote ADB session for that device. All the ADB tools are available to you, all without leaving your office.
To exit your ADB session, simply enter CTRL+C into the terminal window.
There are also a few other tools you can leverage to gain visual access to the device or grab the most recent logs.
Access Remote Viewer And Control, Get Bug Logs
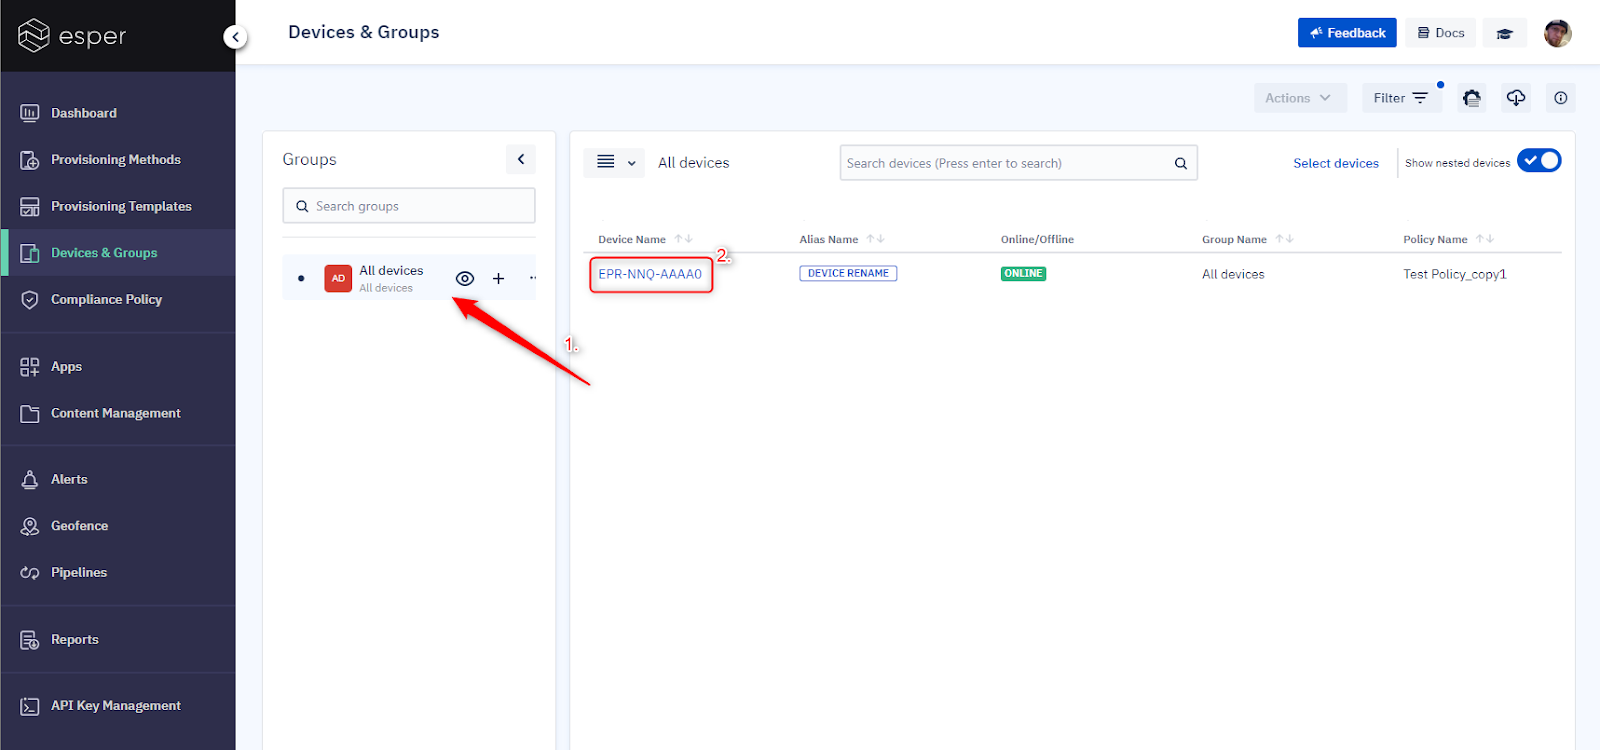
Esper also has a few other tools to apply, like remote viewing and log capturing. First, pop into the Esper Console and click on Device & Groups. Choose the group the device belongs to, then click on that device.

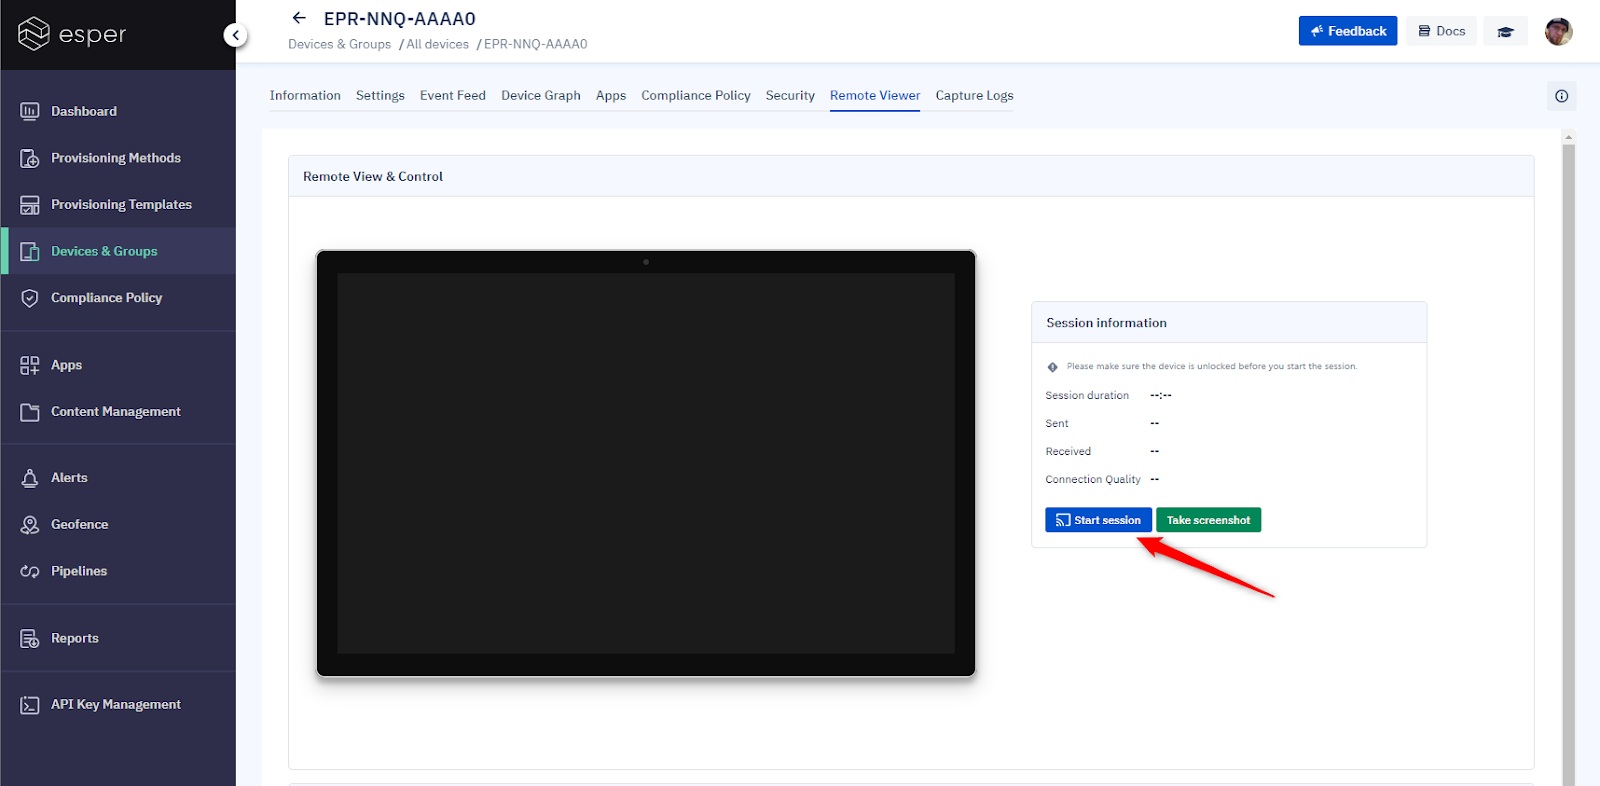
From there, click the Remote Viewer option to get a live view of the device’s screen and see what’s going on to determine if it’s a user error or training issue.

Suppose you’re looking at a device where the device manufacturer has signed Esper’s remote control plugin (which we are happy to get done for you for your devices) or is running Esper Foundation for Android (Foundation). In that case, you can fully control the device using the Start Session option on the right side.

For non-Foundation devices, the Remote Viewer will still work, though you’ll have to enable remote control separately.
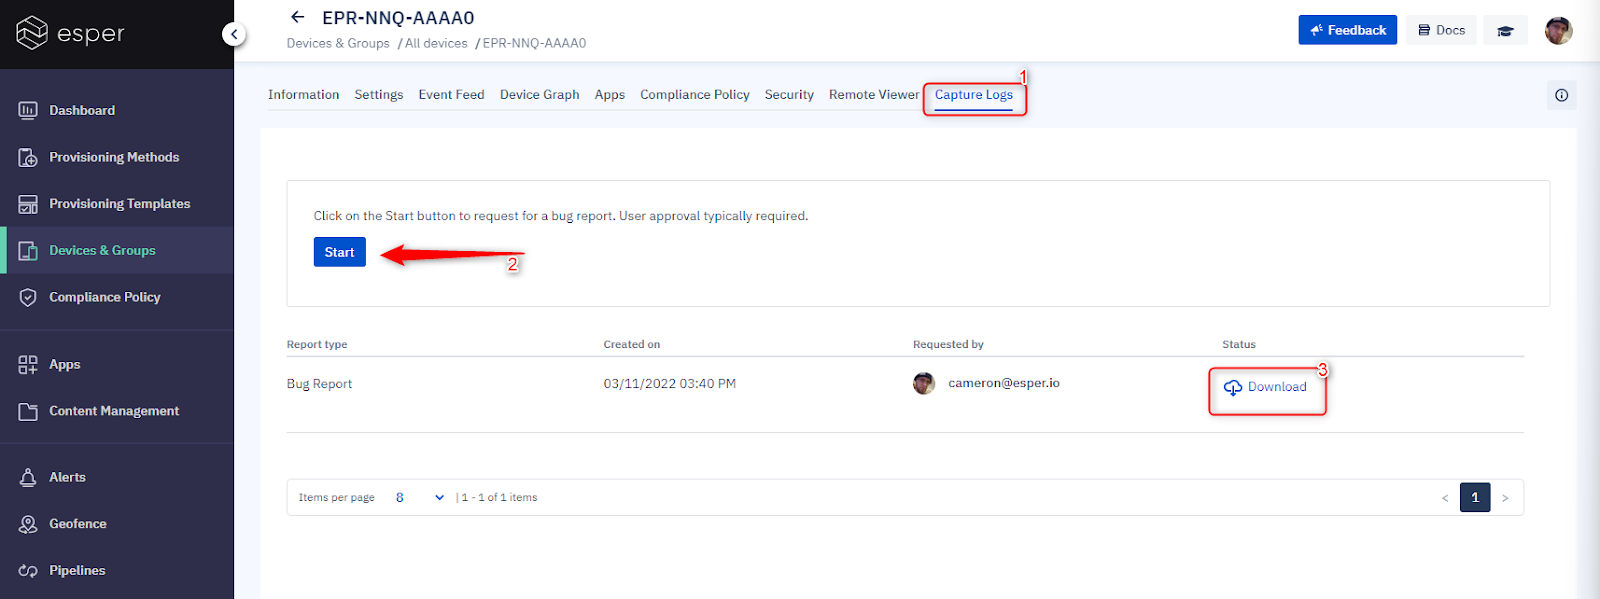
If you need to capture bug report logs, you can easily do that with the Capture Logs button at the top, then click the Start button to request a report. This will take a few minutes to complete, but once the report is available, you’ll have an option to download it.

Now that you have the log in hand, you could try reproducing the bug locally. If you have the same hardware in your test lab, you can use an Esper Device Template to grab the same template and provision the test device to the same configuration as the deployed device to see how it goes.
If you combine the Remote Viewer with Secure Remote ADB, you can utilize powerful tools like logcat to see a realtime readout of what’s happening. So, for example, you can fire your app up, then use logcat to track crashes and debug messages. This is more convenient than capturing logs from the console, as it doesn’t require permission to pull logs. Using the Capture Logs option in the console requires share approval on each use.
Logcat is pretty simple in execution:
adb logcat
Though you can add options and filters for more granular output.
And that’s it!
Give it a try and start remote debugging your deployed apps for your purpose-built device fleet using Esper. You can start by logging into your Esper platform or signing up for a free trial.
