
Provisioning is the process of setting up new IT resources, either locally or in the cloud. There are many types of provisioning depending on the system being deployed—network provisioning, server provisioning, user provisioning, and device provisioning are all common examples.
This guide focuses on device provisioning: what it means, how enrollment and configuration fit into the process, and how modern MDM platforms streamline the entire workflow. Whether you're deploying ten tablets or ten thousand, the concepts here will help you build a repeatable, scalable approach.
Provision a Device in Minutes
What Does Device Provisioning Encompass?
Device provisioning is the process of setting up hardware—tablets, displays, sensors, handsets—so it's ready to perform a specific function. This can range from replacing the entire operating system (“imaging”) to simply toggling features on or off.
Common provisioning actions include:
- Installing a specialized OS or firmware
- Disabling or enabling hardware features (wireless, speakers, cameras)
- Pre-loading required apps and certificates
- Applying security policies before deployment
With Esper, provisioning might mean installing Foundation to lock a device into single-app kiosk mode, or using a blueprint to secure a stock Android tablet as a retail POS terminal.
Provisioning is part of the deployment process — the collection of steps required before a device is ready for use. The first step of device provisioning is enrollment.
What Is Device Enrollment? Is Enrollment Part of Provisioning?
Device enrollment is registering a device with your MDM or enterprise infrastructure — it's typically the first step in provisioning. Whether you flash an OS image before or after enrollment depends on your workflow, and both approaches are completely valid.
In MDM (Mobile Device Management) terms, enrollment gets the device onto the platform so you can manage it remotely (sometimes called "onboarding").
Android supports several enrollment methods:
- 6-tap QR: Factory reset, tap six times, scan a QR code
- Android Enterprise (AfW): Managed Google Play–based enrollment
- Google Zero-touch enrollment: A zero-touch provisioning option where devices auto-enroll on first boot
- NFC bump or token-based: Useful for rugged or headless devices
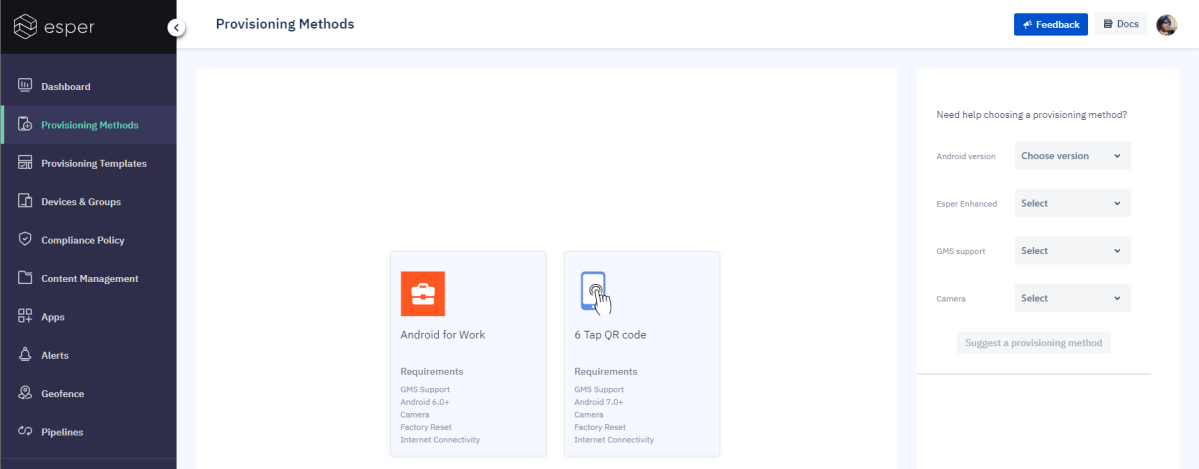
For example, if you want to enroll a device onto Esper using the 6-tap QR method, you first factory reset the device. On the setup screen, tapping 6 times will open the QR code scanner. You can access a QR code for the specific blueprint from within the Esper console, which you scan from the Android device. From there, the device will automatically enroll onto Esper.
What's the Difference Between Provisioning and Configuration?
Provisioning prepares the hardware; configuration tailors it to your specs. Think of building a new PC: provisioning installs the OS, configuration installs your apps and settings.
If you've been researching provisioning, you've probably also read about device configuration. Here's how the two compare:
In many provisioning scenarios, the last step of provisioning is to launch the configuration software. With Esper, we make it much simpler.
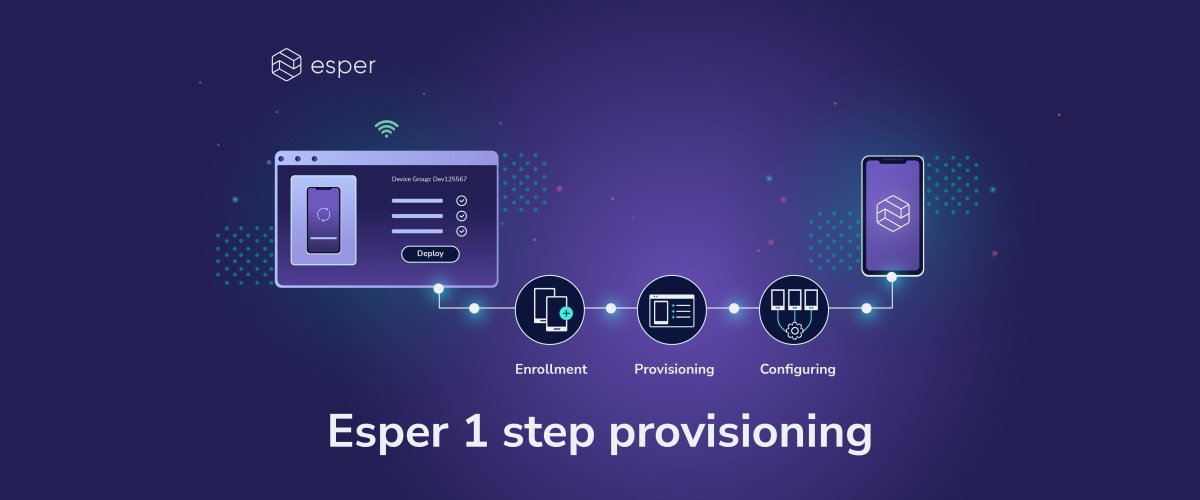
How Esper Simplifies Enrollment, Provisioning, and Configuration
Esper combines enrollment, provisioning, and configuration into a single step. Scan the QR code, and the blueprint handles the rest: OS policies, app installs, security settings. All you do is build the blueprint once.
With device deployment, that usually means physical deployment — getting the device to the site where it will be used. For software deployment, which includes updates, it means making the software available to the end user. So, for example, pushing an application or updated application to endpoints like computers or tablets.
In some cases, provisioning can be a part of deployment, but given the broad meaning of deployment, it’s better to think of these as two separate processes.
How Esper Simplifies Enrollment, Provisioning, and Configuration
Esper combines enrollment, provisioning, and configuration into a single step. Scan the QR code, and the blueprint handles the rest — OS policies, app installs, security settings. All you do is build the blueprint once.
Blueprints are simple yet dynamic starter kits for device enrollment that contain your chosen configurations, settings, and business apps. Each blueprint is auto-assigned a single QR code for the entire configuration set. From here, there are a few advantages:
- Creating a blueprint takes about five minutes (average)
- Each blueprint can be reused as many times as you want
- There's no need to recreate configurations and settings for each device or download any apps to start onboarding.
By streamlining the enrollment, provisioning, and configuration processes, we were able to reduce onboarding time, avoid unnecessary app downloads, reduce repetitive actions, reduce the number of required steps, and ultimately simplify the onboarding process. To see how simple it really is, give us a try today for free — no commitment necessary.